Case building takes place in the detail view of a specific case. Double click on a case to open the detail view.
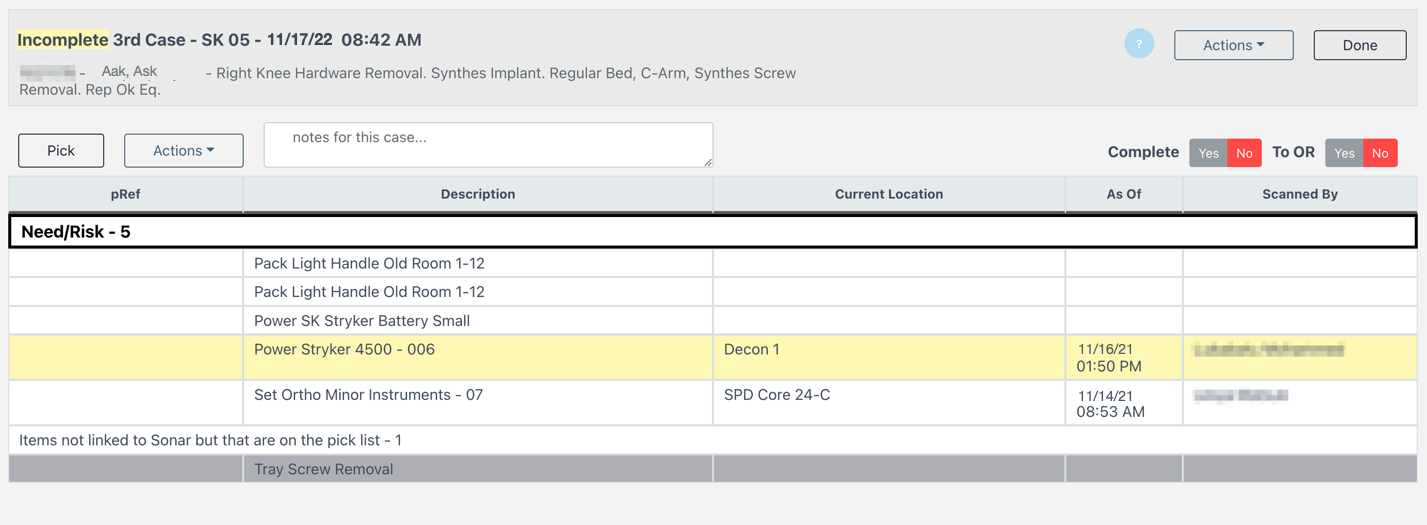
The items listed below the case details are fed into Sonar based on the EMR system surgeon preference card. To pick the items, scan the production barcodes to the case.
pRef
The unique Production Reference number for each inventory will be listed in this column. They are captured by scanning the production barcode of the item, or by using the Pick button.
Current Location
If an item is linked, before it is picked the current physical location will show in this field. The column is removed when the case is delivered ToOR.
Description
Name of the requested Item. If the inventory is linked, it will show the recommended inventory number as well.
As of
Before the item is scanned to the case, the date and time that the item was scanned to the current location if displayed. Once the item is picked, the date and time that it was added to the case is displayed.
Scanned By
The name of the technician who scanned the trays to their current location. Once the item is picked, the name of the person picking the case will be listed.
Sections
The total quantity of items in each section is always displayed within the section header to the right of the title.
Need/Risk
Most of the items required for the case will be in this area. (what is the difference between need and turn???)
Items not linked to Sonar but that are on the pick list
The items listed in this section are the EMRNeedsFix items. Scanning corresponding inventory to the case will not make these items fall off the list as they are not linked to specific items. They will print in the EMRNeedsFix section of the Case Cart Setup report.
Picked
Once an item is scanned to the case, the row color will change to green and the item will move to this section. If a case cart is scanned to the case, this section will change to the name of the case cart and the number of items within it.
Don't Need
Remove items from other sections and add them to the Don't Need section by using the Actions > Don't Need option or Right Click > Don't Need to apply. These items will not print on the Case Cart Setup report, but they will remain in the electronic record.
Actions
Adding a Case Cart
There can be several case carts assigned to one case, several cases can use the same case cart, or there does not need to be a case cart associated. The system is flexible to support multiple workflows. There are two options for adding case carts:
- Scan the location label barcode on the physical case cart
- Manually type the location barcode value into the Pick button.
Adding an Item
There are several ways to pick an item for a case:
- Scan the production label barcode
- Use the Actions > Add Item option to add an item manually
- Use the Pick button and manually assign the inventory pRef
Locating an Item
The Locator Module is integrated with the Cases detail view. The integration allows technicians to easily locate the items they are looking for without leaving the Cases Module. Learn more about locating items in the Cases Module here.
Printing
The Case Cart Setup report will print upon the delivery of a case ToOR. It can be printed at any time from the Actions > Print option in the top right corner of the case detail view. Each case cart will have a Print button next to the name of the cart. Use this button to print or reprint the Case Cart Setup report for a specific case cart.
[ case cart with print button ]
Unpick
Select Unpick to remove an item that has been scanned to the case. The item will be removed to a "limbo" location. The specific location of the item will be listed in the locator as Unpicked from case, location unknown. Once the case is complete, the only option available in the right-click quick menu is the Unpick action.
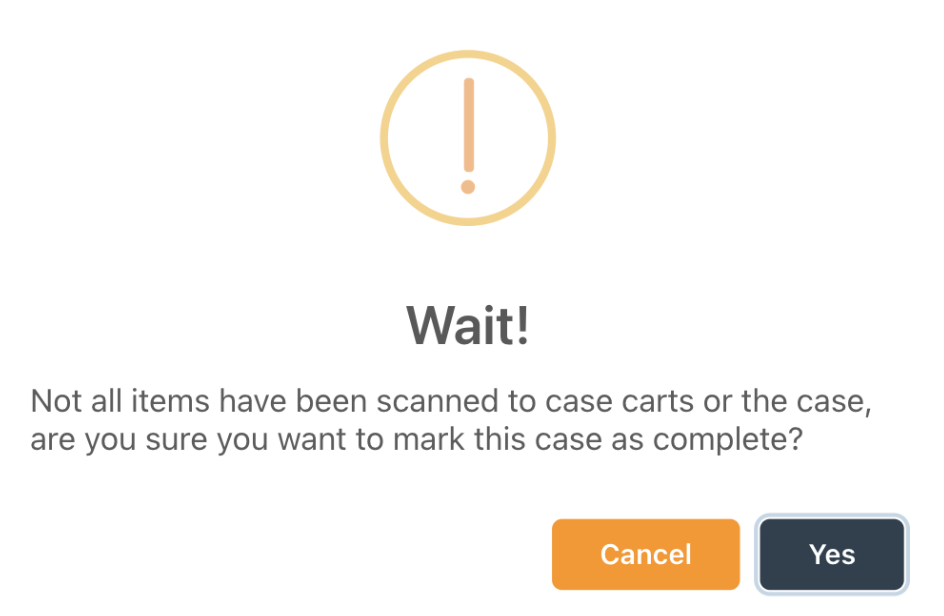
Delivering ToOR and Marking Complete
Once all of the trays have been scanned to the case, adjust the Complete toggle switch to Yes. Cannot be changed to Incomplete status again if it has been completed. Then deliver ToOR by adjusting the toggle switch to Yes. The Case Cart Setup report will print upon delivery of the case ToOR.
If a workstation does not have a barcode scanner, you can still manually deliver items to a case cart using the Deliver Module. You can also manually pick items to cases using the Pick button in the Cases Module detail view.
Display
Once a case is fully picked, marked Complete, and delivered ToOR, the information displayed in the case detail view will adjust slightly.
Case Details
The case information will have an added field once picking is completed, the case is marked Complete, and it is delivered ToOR.
- Name of technician who completed the case picking
- Date of case picking completion
- Exact time of case picking completion
As Of
Once specific inventory is scanned to the case, the As Of field will change to display the exact date and time that it was added to the case.
Current Location
In the home screen list view, the operating room will display once the case is delivered ToOR.
Case Cart
In the home screen list view, the specific case cart(s) will display once they have been scanned to the case.